Favicon Quantization
It has nothing to do with quantum mechanics, I think.
Tagged with: csharp, programming
Published on
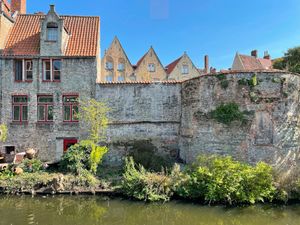
Recently I stumbled upon the tool Schrödinger Hat which can be used to transform images to only use the colors of specific color palettes. What does that mean? Look at the following image that I took during my trip to Bruges.

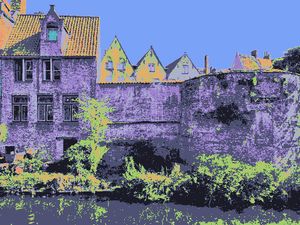
After I processed it with the tool using the Tokyo Night palette the old houses of Bruges look more like a place that can be found in the Feywild than a place in Belgium.

Seeing those images I got an idea for a new favicon. I wanted to retire my previous favicon for quite some time now so I started experimenting. After looking at the website of the tool I found out that it is based on the Python library ImageGoNord. It was time to warm up my rusty Python skills and fire up a Jupyter notebook.
Looking at the library and experimenting with some images I found out that one of the methods that the library uses is color quantization. This image processing method can be used to reduce the number of colors in an image. Usually, the goal is to use fewer colors than the original image uses while still maintaining the original look of the image. One of the reasons to do this is to reduce the size of an image. If you want to know more about this process I suggest you take a look at the color quantization article on Wikipedia.
Unfortunately, I was not happy with the results I got from the Python library so I looked into some alternatives in the .NET/C# space with which I am more familiar. Luckily the great ImageSharp library which I already had the pleasure of working with in the past has quite an impressive repertoire of image processing options. One of them being color quantization. I played around for some time and finally reached a result with which I was happy.
In the following code block you can see the whole program I used to process the image. First, the image called me.jpg gets loaded. Then a palette using the primary colors of the website is created and used to initialize a PaletteQuantizer. Using the Mutate function a chain of modifications is applied to the image. In this chain the image is converted to black and white, then the contrast is increased and finally, the quantization is applied. The only step left is to save the created image. As a side note, I want to mention that I did all this using a .NET Interactive Notebook which was a pleasant experience.
using SixLabors.ImageSharp;
using SixLabors.ImageSharp.Processing;

using var image = Image.Load("me.jpg");

var palette = new []{
    // Grey
    new Color(new Rgb24(0x2E, 0x34, 0x40)),
    // Green
    new Color(new Rgb24(0x48, 0xbb, 0x78)),
    // Pink
    new Color(new Rgb24(0xf6, 0x87, 0xb3)),
};

var quantizer = new PaletteQuantizer(palette);

image.Mutate(x => x.BlackWhite()
    .Contrast(1.5f)
    .Quantize(quantizer));

image.Save("favicon.png");
Now for the big reveal here are the source photo I used for my favicon and the processed version of the image using the code above.


As you can see, all it takes is one library and a handful of lines of C# code to apply some major modifications to an image. The next time I have to resize some pictures I will think twice if I open GIMP or instead write a quick C# program to do the job.
